Showing posts with label Payables. Show all posts

Thursday, September 14, 2017

Supplier Site Creation Error -- ORA-01403: no data found in Package AP_VENDOR_PUB_PKG Procedure Validate_Vendor_Site

It seems there is Payble Option setup for that perticulat OU

Please check:

1.  The issue appears to be caused because you do not have this org setup in AP.  Please confirm this with the following:

 select *
 from ap_system_parameters_all
 where org_id = 123;

 If this does not return a row, the problem is an AP org has not been set up.
  
2.  Navigate to Setup > Options > Payables Options and create a record for this operating unit.

Refer to Page 1-49 and following of the Payables Implementation Guide for instructions on how to set up an AP org.  Since you do not have a financials implementation, many of these options may not apply to you, but the record in AP is still required.

3.  Confirm the query in step 1 now returns a row, and then confirm the supplier page no longer gives an ORA-01403 when attempting to create a supplier site.

Friday, January 30, 2015

PO To FA - Mass Additions Process


 Step -1 : Create an Item

1. Create an item and assign expense account in Purchasing tab. Here account ( 159 ) is an Asset/CIP Clearnce Acoount.
2. Assign Item to child orgs.


Step - 2 : Create Purchase order and receive the item


Mass Additions Create Program Overview

The Mass Additions Create Program is submitted from an Accounts Payable (AP) responsibility. The purpose of the program is to interface the costs of purchased items that meet the criteria to become an asset. It also interfaces adjustments to the invoice cost and discounts taken when the invoice is paid for assets that have already been interfaced.

Types of Assets:

There are three types of assets:

•    capitalized
•    construction-in-process (CIP)
•    expensed

Which type of asset an invoice distribution becomes depends on the natural account segment and the asset category configuration. Any invoice distribution that is charged to an expense account is eligible to be transferred to Fixed Assets (FA) as an expense type asset if the “Track as Asset” option is selected on the distribution line. These expenses are not depreciated in FA, but they are reported as an expense. Capitalized assets will start to depreciate based on the depreciation method rules and the date placed in service. CIP assets do not depreciate until the asset is capitalized and placed into service in FA after they have been transferred.

FA Setups:

1.    Define the account type of an account

Responsibility: General Ledger
Navigation: General Ledger --> Setup --> Flexfields --> Key --> Values

Define the segment qualifier “Account Type” as either Asset or Expense.

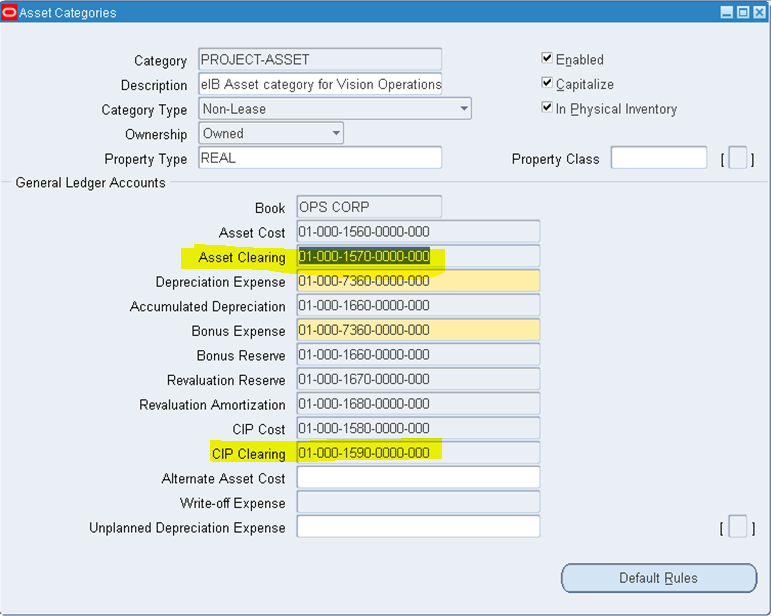
2.    Define the asset clearing and CIP clearing accounts for an asset book

Navigation: Fixed Assets -->  Setup --> Asset System --> Categories

For the mass additions process, only the natural account segment is evaluated. We can use the same natural account with different company or cost centers, and they will still be selected as an asset. In R12, We can now specify the Asset Book at the invoice distribution level so We ensure the distribution is transferred to the correct asset book.


In the screen shot above, the third segment is the natural account segment, so account 1570 and 1590 are the two natural account segments that the Mass Additions Create Process will use to transfer costs from Payables to the OPS CORP book.

3.    Enter an invoice and ensure the track as asset flag is selected

Navigation : Payables -- > Invoices --> Entry --> Invoices

Note: In the distributions screen, the Track as Asset field is not displayed by default. It is automatically checked for all asset type accounts and cannot be unchecked. To set the flag for expense type assets, go to the Folder --> Show Field option and select to display the Track as Asset field. And Enter Asset Clearance Account at Distribution Level.


Click on Action Button to Do Validation, Create Accounting and To Make Payment by selecting "Pay in Full"

4. Mass Addition Program

Mass Addition Program is used to transfer the Asset purchases information to the Assets
module for further process. Before running mass Addition Program make sure Invoice and payment information transferred to GL.

Run Request Set "Mass Additions Create" From Payables Super User Responsibility.

5. Go to FA Super user Responsibility > Mass Addition > Prepare Mass Addition > Search With Invoice Number.

Click on Open and change Queue = POST and Save.

6. Run "Post Mass Additions".

Go to FA Super user Responsibility > Mass Addition > Post Mass Additions.

Now, Go to Asset Work Bench and search with Invoice Number. New Asset got Created.

***************************************************************
For Online And Classroom Training on 
R12 SCM Functional
Fusion Procurement
Fusion SCM
Fusion Procure To Pay
Please Contact -
Gmail # rishitechnologies9@gmail.com
Cell # 9071883639


Monday, January 12, 2015

How To Cancel Prepayment Invoice

To cancel an Unapplied prepayment:

1.    Void Payment associated with prepayment.
    Got To Payables Responsibility > Payments > Entry > Payments > Query with Payment Number > Actions1 (B) > Check Void Check Box > Ok (B)
2.    Cancel Prepayment Invoice.
    Got To Payables Responsibility > Invoices > Entry > Invoices > Query with Prepayment Invoice Number > Actions1 (B) > Check Cancel Invoices Check Box > Ok (B)
   
3.    Ran Create Accounting Program.


To cancel an Fully Applied prepayment:

1.  Fully Unapply the Prepayment
    Got To Payables Responsibility > Invoices > Entry > Invoices > Query with Prepayment Invoice Number > Actions1 (B) > Use Apply/Unapply Prepayment Check Box
   
2.    Void Payment associated with prepayment.
3.    Cancel Prepayment Invoice.
4.    Ran Create Accounting Program.

***************************************************************
For Online And Classroom Training on 
R12 SCM Functional
Fusion Procurement
Fusion SCM
Fusion Procure To Pay
Please Contact -
Gmail # rishitechnologies9@gmail.com
Cell # 9071883639

Wednesday, January 7, 2015

Overview Of Create Accounting in AP

The Create Accounting program processes eligible accounting events to create subledger journal entries. To create the subledger journal entries, the Create Accounting program applies application accounting definitions that are created in the Accounting Methods Builder (AMB).

The Create Accounting program:

  •     Validates and creates subledger journal entries 
  •     Generates the Subledger Accounting Program Report, which documents the results of the Create Accounting program.  
Accounting entries are automatically generated for transactions based on your accounting setup in Oracle Subledger Accounting and Oracle General Ledger. We can only adjust accounting entries in Payables if we ran the Create Accounting program in Draft mode. To adjust accounting entries, adjust the transaction details and rerun the Create Accounting program.


    Tuesday, April 3, 2012

    R12 - Oracle Payables Part - 1


    Overview Of payable :


    1. Supplier / Creditor Master Creation :

    Please refer my earlier post :

    http://oracleapps99.blogspot.com/2011/08/r12-supplier-creation-part-1.html
    http://oracleapps99.blogspot.com/2011/08/r12-supplier-creation-part-2.html

    2. Invoice Creation :


    2.1 Setup Defaults:

    • Define defaults to speed up data entry.
    • Defaults can be overridden at Invoice level if required.
    • for Ex : define payment terms, to auto-assign multiple payment schedules and discounts when we enter the invoice using this payment term.
    • Define paygroup, to o classify each invoice - Pick one Pay Group and pay all related invoices at one shot.
    • Define Distribution Sets, to auto-create multiple invoice lines with pro-rata amounts when we enter the invoice 
    refer my earlier post for setups :


    http://oracleapps99.blogspot.com/2012/03/r12-ap-payment-setups.html
    http://oracleapps99.blogspot.com/2012/03/r12-ap-invoice-setup-1.html

     2.2.  Enter Invoice :

    We can enter 9 types of invoice by using invoice entry form.

    Type Of Invoices :

    Standard
    Credit Memo
    Debit Memo
    Expense Report
    Prepayments
    Retainage Release
    Transportaion Invoice
    Withhold Tax
    Mixed.

    Create Standard Invoice.

    Invoices --> Entry --> Invoices

    Enter Invoice Header details, like

    Operating Unit, Type, Supplier / Trading partner name, Supplier name, Invoice amount Etc.


     Click on 2 Lines Tab and enter line details like amount and save.


    Click on Distributions Button  --> save


    come back to like and click on line  --. System will calculate the tax based on your tax setup.


    Click on All Distributions Button to see the complete distribition information.


    2.3 Validate Invoice :

    Actions --> Validate --> select Validate check box --> Ok.


    and also we can see the reason from Holds Tab.  we can see all the holds and hold releases information for the invoice.


    correct the invoice amount and validate the invoice --> Actions --> Validate -->  select Validate check box --> Ok.

     Click on View Payments Tab to see the all the payments for the invoice.


     Click Scheduled payments Tab to see all scheduled payments. In our example, we created invoice on 04-Apr-2012 and Invoice Due date / Payment dare also 04-Apr-2012. System will calculate the invoice due date based on payment terms and in our case we used payment terms as "LS Terms". Lets a look into payment terms.


    Technical part :

    select * from AP_INVOICES_ALL where invoice_num = '04-APR-2012_1';

    select * from AP_INVOICE_LINES_ALL where invoice_id = 211325;

    select * from AP_HOLDS_ALL where invoice_id = 211325;

    select amount_remaining, due_date, hold_flag from AP_PAYMENT_SCHEDULES_ALL where invoice_id = 211325;


    SELECT distribution_line_number, line_type_lookup_code, amount, po_distribution_id, amount_to_post from AP_INVOICE_DISTRIBUTIONS_ALL  where invoice_id = 211325;


    ***************************************************************
    For Online And Classroom Training on 
    R12 SCM Functional
    Fusion Procurement
    Fusion SCM
    Fusion Procure To Pay
    Please Contact -
    Gmail # rishitechnologies9@gmail.com
    Cell # 9071883639

    Friday, March 30, 2012

    R12 - AP Payment Setups

    1. Interest rates :

    In the Payment Interest Rates window, you define interest rates Payables uses to calculate and pay interest on overdue invoices. Payables calculates interest on overdue invoices only if you enable both the Allow Interest Invoices Payables option and the Allow Interest Invoices option for the supplier of an invoice.

    (N)>Setup>Payments>Interest Rates

     select * from AP_INTEREST_PERIODS;

    2. Bank Charge Calculation :

    Use the Bank Charge Calculation window to specify charges associated with transferring money between banks. If you use Payables you specify charges between your remittance banks and your suppliers' banks. If you use Receivables you specify charges between your customers' banks and your banks. You can define charges.

     (N)>Setup>Payments>Bank Charges Calculations.


     select * from AP_BANK_CHARGES ;

    select * from AP_BANK_CHARGE_LINES;

    3. Bank and Bank Branches Creation  :

    (N)>Setup>Payments>Bank and Bank Branches.


    Click on Banks --> Create


    Click Save and Next -- > Click on create to create Bank Address --> Enter required fields and click on Apply.


    Click Save and Next  -->  Click on Create Contact to Create contact person/info --> Enter all the required info. We can create any number of contacts by clicking on Add Another Row.
     
    Click on Finish.

     Click on Create Branch to create Bank Branches.

     
    ***************************************************************
    For Online And Classroom Training on 
    R12 SCM Functional
    Fusion Procurement
    Fusion SCM
    Fusion Procure To Pay
    Please Contact -
    Gmail # rishitechnologies9@gmail.com
    Cell # 9071883639

    Thursday, March 29, 2012

    R12 - AP Invoice Setup - 1

    Hi Friends,

    Today i am posting required setups related to Account Payables.

    1. Payment terms : We define payment terms that we can assign to an invoice to automatically create scheduled payments when we submit Payables Invoice Validation for the invoice. we can define payment terms to create multiple scheduled payment lines and multiple levels of discounts. Payment terms have one or more payment terms lines, each of which creates one scheduled payment.

    Setup>Invoice>Payment Terms


    Underlying tables.

    select * from AP_TERMS where name = 'XX_TERM' and term_id = 9999;

    select * from AP_TERMS_LINES where term_id = 9999;

    2. Distribution Sets :

    Use a Distribution Set to automatically enter distributions for an invoice when you are not matching it to a purchase order.
    We can assign a default Distribution Set to a supplier site so Payables will use it for every invoice you enter for that supplier site. If we do not assign a default Distribution Set to a supplier site, we can always assign a Distribution Set to an invoice when we enter it.

    (N)>Setup>Invoice>Distributions Sets

     For Ex : Create an invoice and assign above created distribution set.


    Click on Distributions button. verify the amount is distributed onto two accounts based distrinution set.


     select * from AP_DISTRIBUTION_SETS where distribution_set_name = 'XX_NAME';

    select * from AP_DISTRIBUTION_SET_LINES where distribution_set_id = 9999;

    3. Tolerances :

    Use the Invoice Tolerances Template window to define the matching tolerances we want to allow for variances between invoice, purchase order, and receipt information. we can define both percentage-based and amount-based tolerances.
    Tolerances determine whether Payables places matching or tax holds on an invoice. When we submit Payables Invoice Validation for an invoice that we have matched to a purchase order or receipt, Payables checks that the invoice matches the purchase order or receipt within the purchase order matching tolerances you define.

    (N)>Setup>Invoice>Tolerances 


     select * from AP_TOLERANCE_TEMPLATES where tolerance_name = 'TEST_9';

    4. Hold and Release Names : 

    Use the Invoice Hold and Release Names window to define the names that we use to manually hold or release invoices. We can define hold names that we assign to an invoice during entry to place the invoice on hold.

    (N)>Setup>Invoice>Hold and Release Names

     select * from AP_HOLD_CODES;

    5. Pay Group :

    Pay Groups are used to classify each invoice - Pick one Pay Group and pay all related invoices at one shot.

    Setup -->  Lookup  --> Purchasing


    ***************************************************************
    For Online And Classroom Training on 
    R12 SCM Functional
    Fusion Procurement
    Fusion SCM
    Fusion Procure To Pay
    Please Contact -
    Gmail # rishitechnologies9@gmail.com
    Cell # 9071883639

    Friday, August 26, 2011

    R12 - AP Auto Invoice Creation

    Hi friends,

    Today we will see how to allow system to create invoice automatically upon reciept.

    1. By Using Self Billing :

    By Using selg Billing tab in supplier form, we can create standard invoice upon receipt.

    Navigation : Payable responsibility --> Suppliers --> Entry

    Query with supplier name . Ex : Supplier Name : Consolidated Supplies

    After query with supplier, clisk on purchasing  --> Self Billing Tab

    Select Pay On = Reciept  --  This means upon completion of reciepts , system automatically create the STANDARD Invoice.


    System will create standard invoice automaticaly and invoice number generation is depends on the value entered in Profile :  PO: ERS Invoice Number Prefix

    2. By Using  "


    Thursday, August 25, 2011

    R12 - Merging Suppliers


    Use the Supplier Merge program to maintain your supplier records. You can use it to merge duplicate suppliers into a single, consolidated supplier and to merge transactions within the same supplier from one supplier site to a different supplier site. You can choose to merge all transactions for a supplier into a new supplier, or you can just choose to merge unpaid invoices.

    Merging suppliers is an irreversible action. You cannot reverse the merge once it has completed. Before you initiate the merge program, you should be sure that the action you want to take is final.

    Refer the below screen schot. supplier XXDell is having 2 supplier sire Marina and Sam Francisco. Now we are going to merge Marina supplier site.


    Run the Supplier Merge Program :
    Navigation : Payables responsibility --> Suppliers --> Suppliers Merge

    Select the From and To Information and Click on Merge Button. Once you click on Merge, " Supplier Merge Program " will run in back end.  Once Concurrent program " Supplier Merge Program " was ran succesfully verify the supplier information. Now you can find only one site " San Francisco ".


    While merging, we need to decide the effect the merge on existing purchase orders and invoices. 

             For purchase orders, we need indicate whether we want all or none of the existing purchase orders to be updated with the new supplier/site names by checking or unchecking the PO Check Box.
             For invoices, we can indicate whether we want all, only unpaid, or none of the invoices to be updated with the new supplier/site names.